 Although Raspberry Pi does not support reading analog values out-of-the-box it is quite easy to add this capability. All you need is a ADC (Analog to Digital Converter). Basically a ADC converts a analog value (between 0V – 3,3V on Raspi) and into a stream of digital “bits” (serial communication). This guide will focus on how to read analog data through the MCP3008 using NodeJS on Raspberry Pi 2. MCP3008 is a ADC that uses SPI for serial communication. Although this guide focuses specifically on MCP3008 the approach would be much the same regardless of which type of SPI device you want to connect.
One challenge when trying to read analog data through an ADC via SPI in NodeJS is the lack of code examples. Most of the guides focuses on using Python, and since I consider NodeJS to be a great companion to a Raspi my intention is to fill this information gap with this guide.
If you do not care about understanding the basics of SPI and the details of how MCP3008 (and other similar components) work, you can skip directly to the code and download my Raspberry Pi MCP3008 module and look at the example code.
The basics of SPI
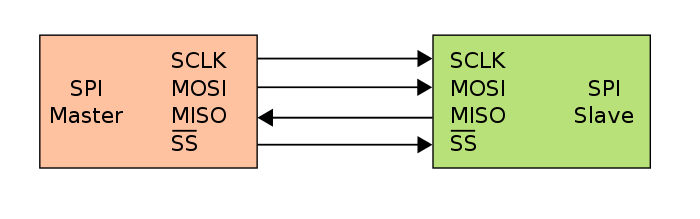 SPI uses a clock signal (CLK) and two data lanes (input & output). The data wires is called MOSI (Master Out – Slave In) and MISO (Master In – Slave Out). The clock is telling the device when to send data (and determines the speed of how often this is done, i.e. the frequency). There is also a chip select which is used for the master to tell which slave device should listen and respond on the data channels (not all devices need this tough). For now we can leave the clock signal aside, just knowing it is needed. Also, the MCP3008 do require a chip select so just leave it that it is needed and let’s not dig into why and how it works. If you need a more thorough explanation and more details on how SPI works I recommend to Google it.
Why is it important to understand the basics of SPI when all you want to do is write some code and read some values? Each type of device has it’s own particular behavior or “communication protocol”, for example which bytes that trigger a read command, and because of this it is helpful to understand the differences and get the basic knowledge needed to apply the same principles on other device types.
The data part of SPI works so that the master will send out a byte (or multiple bytes) and will expect one byte back (for each byte sent). If the master sends out three bytes this will tell the slave to perform a specific action, and then the master will listen for three bytes of data sent back from the slave. This behavior can be observed in my Troubleshooting SPI on Raspberry Pi using NodeJS guide.
Knowing this we can head on and look to the specific behavior for the MCP 3008.
The specifics for MCP3008
 When using a MCP3008 as a ADC you need to know four things. First of all the device has a maximum operating frequency of ~1Mhz, and depending on the framework you are using you might have to change the SPI frequency to match the device (a lower frequency will work but each reading will take longer time). Secondly you need to know that the device has 8 analog input channels. Then you need to know MCP3008 has a 10-bit resolution, which means a single byte (8 bits) is not enough to store the maximum value (1023). Finally you need to know MCP3008 will expect three bytes for each command (transfer).
When you send a command it should contain these three bytes:
[TRIGGER] [MODE] [JUNK]
Trigger is to tell the device that you (the master) expect to receive data. The second byte, mode, tells what data you want (MCP3008 supports two different modes and eight channels). The last byte is just junk (or a placeholder for the response data). The trigger should always be a 0x01 (decimal ‘1’) and the same goes for the junk byte. The mode byte should tell which channel to read (which I leave out for now).
The response of each transfer will contain the following:
[JUNK] [MSB] [LSB]
First we have a junk byte, this is simply ignored. Then we have the Most Signifiant Byte (the “leftovers” when the first 8 bits is filled) and then we have the Least Significant Byte (the “least valuable” 8 bits of the totalt 10 bit value).
Sending the following three bytes would tell the ADC to begin reading data on channel 0 in normal mode.
0x01 0x80 0x01
And as a response we could have got these three bytes:
0x00 0x03 0xFF
In this example we got the highest possible value (1023 @ 10 bit). If we look at the bits of the MSB and the LSB they would look like this:
JNK = 0x00 = 00000000 (0)
MSB = 0x03 = 00000011 (3)
LSB = 0xFF = 11111111 (255)
The junk-byte and the first 6 bits of MSB is always ignored, and we are left with 10 bits (2+8).
00000000 00000011 11111111With some bit shifting we can combine these two separate bytes into one 10-bit decimal value (actually it is 16 bits, or two bytes, but with a maximum value of 1023).
VALUE = (MSB << 8) + LSB = 1023
Wiring the MCP3008 to your Raspberry Pi
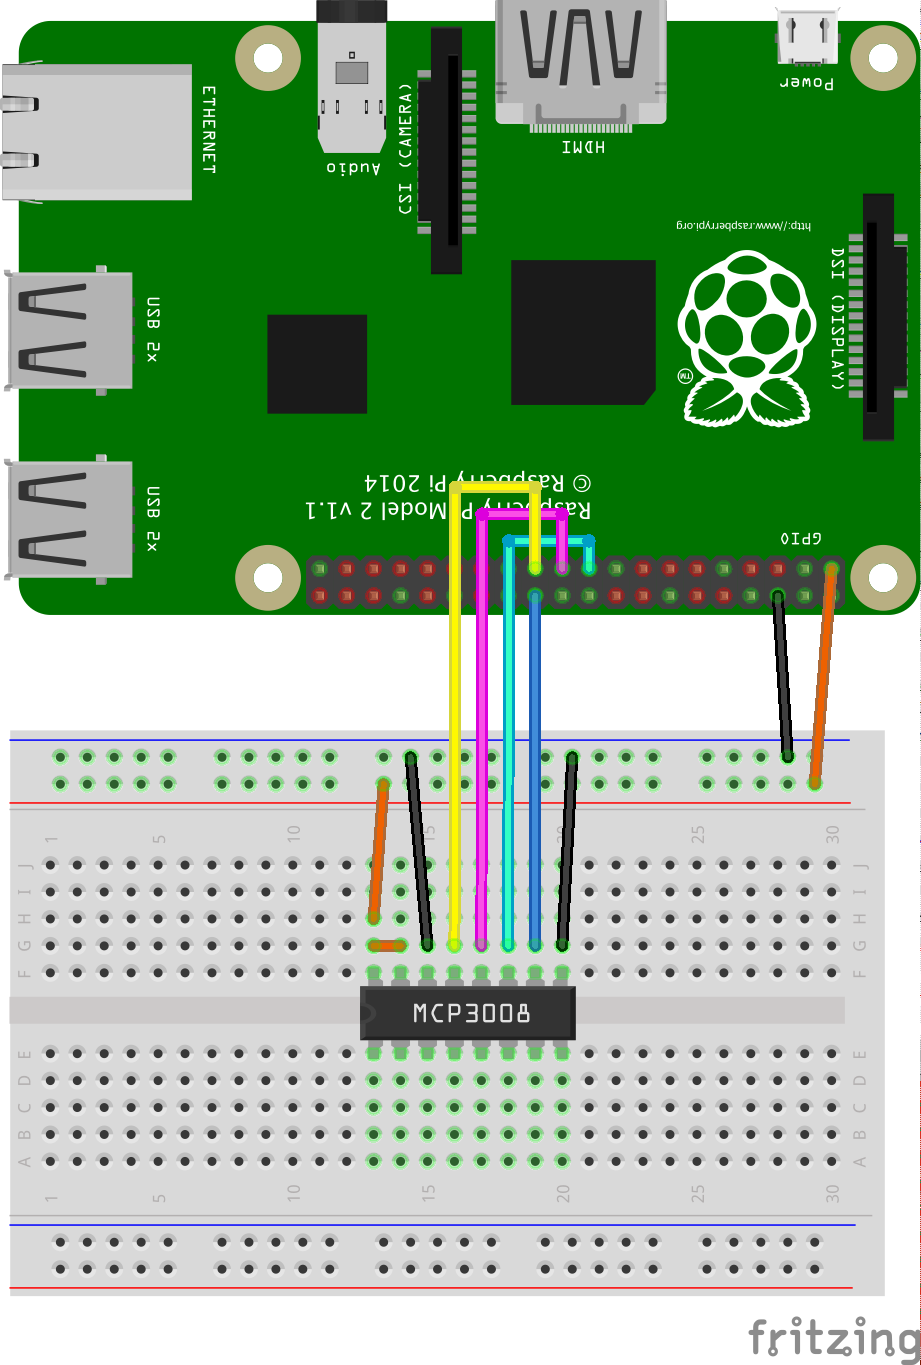
 Before we can begin reading any data from your ADC you first have to wire the MCP3008 to the SPI pins on your Raspberry Pi (this example uses pin numbering for version 2 and B+).
Wire your Raspberry Pi to your MCP3008 accordingly to the following pin numbering (with the Raspi pins to the left and your ADC to the right):
- Pin 19 (MOSI / #10) -> pin 11 (Din)
- Pin 21 (MISO / #9) -> pin 12 (Dout)
- Pin 23 (SCKL / #11) -> pin 13 (CLK)
- Pin 24 (CD0 / #8) -> pin 10 (CS)
- Pin 6 (GND) -> pin 14 (AGND) & 9 (DGND)
Now you should have a fully working SPI connection between your Raspi and ADC.
The code
Let’s write some code to read the values from MCP3008. At this stage you should ge seemingly random values (as you yet has no inputs connected generating any actual readings). Run the code below and you should expect and output similar to this:
ch0 = 112
Create a new NodeJS script with the following code (relies on the rpio npm library):
var rpio = require('rpio');

rpio.spiBegin();

// Prepare TX buffer [trigger byte = 0x01] [channel 0 = 0x80 (128)] [dummy data = 0x01]
var sendBuffer = new Buffer([0x01, (8 + 0 << 4), 0x01]);

// Send TX buffer to SPI MOSI and recieve RX buffer from MISO
var recieveBuffer = rpio.spiTransfer(sendBuffer, sendBuffer.length);

// Extract value from output buffer. Ignore first byte (junk).
var junk = recieveBuffer[0],
    MSB = recieveBuffer[1],
    LSB = recieveBuffer[2];

// Ignore first six bits of MSB, bit shift MSB 8 positions and
// lastly combine LSB with MSB to get a full 10 bit value
var value = ((MSB & 3) << 8) + LSB;

console.log('ch' + ((sendBuffer[1] >> 4) - 8), '=', value);
(you can download the source code from gist.github.com)
The screenshot below illustrates how the readings on all eight channels would look if they where polled repeatedly, with no input connected to the ADC, using my MCP3008 SPI Dump utility. What we see is the variation of random numbers that occur when no actual input is available.

Some actual tests
Now wire channel 0 (pin 1 on your ADC) to GND and run your script once again.

Hopefully you should now get a consistent reading close to zero (but probably not absolutely zero).
ch0 = 2
And in SPI Dump the channel 0 connected GND result would have looked like this (still random numbers for all channels but channel 0 where we have an actual input to read):

Now connect channel 0 (pin 1) to +3.3V and run the script yet again.

This time you should get 1023 (which is the maximum value and equivalent to the 3.3V reference voltage).
ch0 = 1023
And in SPI Dump the channel 0 connected to 3.3V would have resulted in a reading like this:

That’s it, now you should be up-and-running with your MCP3008 ADC reading analog values and sending them as digital numbers through SPI to your Raspberry Pi. Happy coding!
Links
spi_exmple.js – Example script reading from channel 0 on MCP3008 using NodeJS
NodeJS SPI Dump for MCP3008 – Simple SPI dump utility for MCP3008 written in NodeJS
rpio npm package – Raspberry Pi GPIO library for NodeJS with support for SPI and I2C
Raspi SPI documentation – Details about the SPI driver on Raspberry Pi

Hi Mikael, love these articles!
I posted an issue I had with the code example at Github that I have on my Pi2 with spi_example.js and spi_loopback.js which effectively give me the same output error message. However, spi_dump does seem to work and I’ve had a look at all the code snippets and they seem quite similar, but I’m still scratching my head. The problem line seems to be
return binding.spi_transfer(txbuf, rxbuf, len);
Any ideas?
LikeLike
What version of the rpio-lib do you have installed? My initial thought would be some issue with the input buffer or the length of the output buffer, but it’s quite hard to assess without more details.
LikeLike